4.7 Hexo 搭建博客教程

现在越来越多的人喜欢利用Github搭建静态网站,原因不外乎简单省钱。本人也利用hexo+github搭建了本博客,用于分享一些心得。在此过程中,折腾博客的各种配置以及功能占具了我一部分时间,在此详细记录下我是如何利用hexo+github搭建静态博客以及一些配置相关问题,以免过后遗忘,且当备份之用。
一、创建博客项目
1.1 准备工作
下载node.js并安装(官网下载安装),默认会安装npm。
下载安装git(官网下载安装)
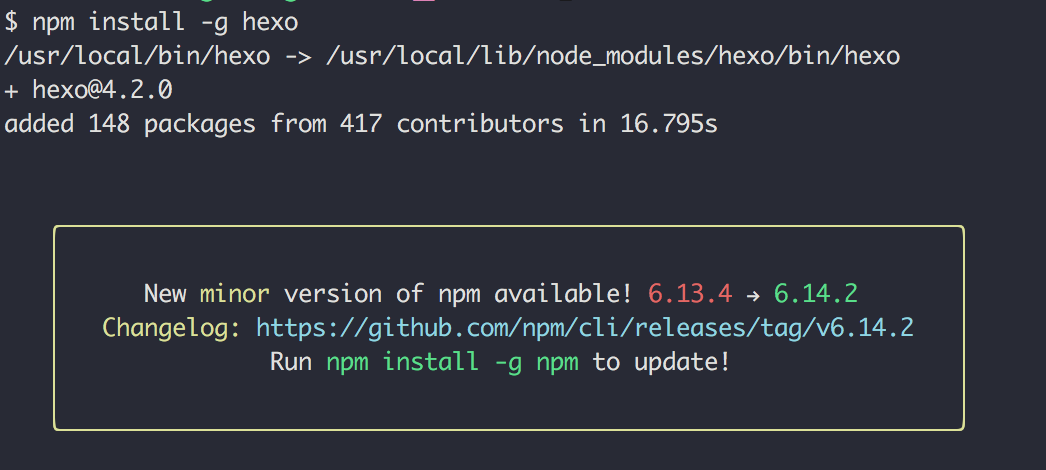
下载安装hexo。方法:打开终端 运行
npm install -g hexo(要翻墙)
1.2 初始化项目
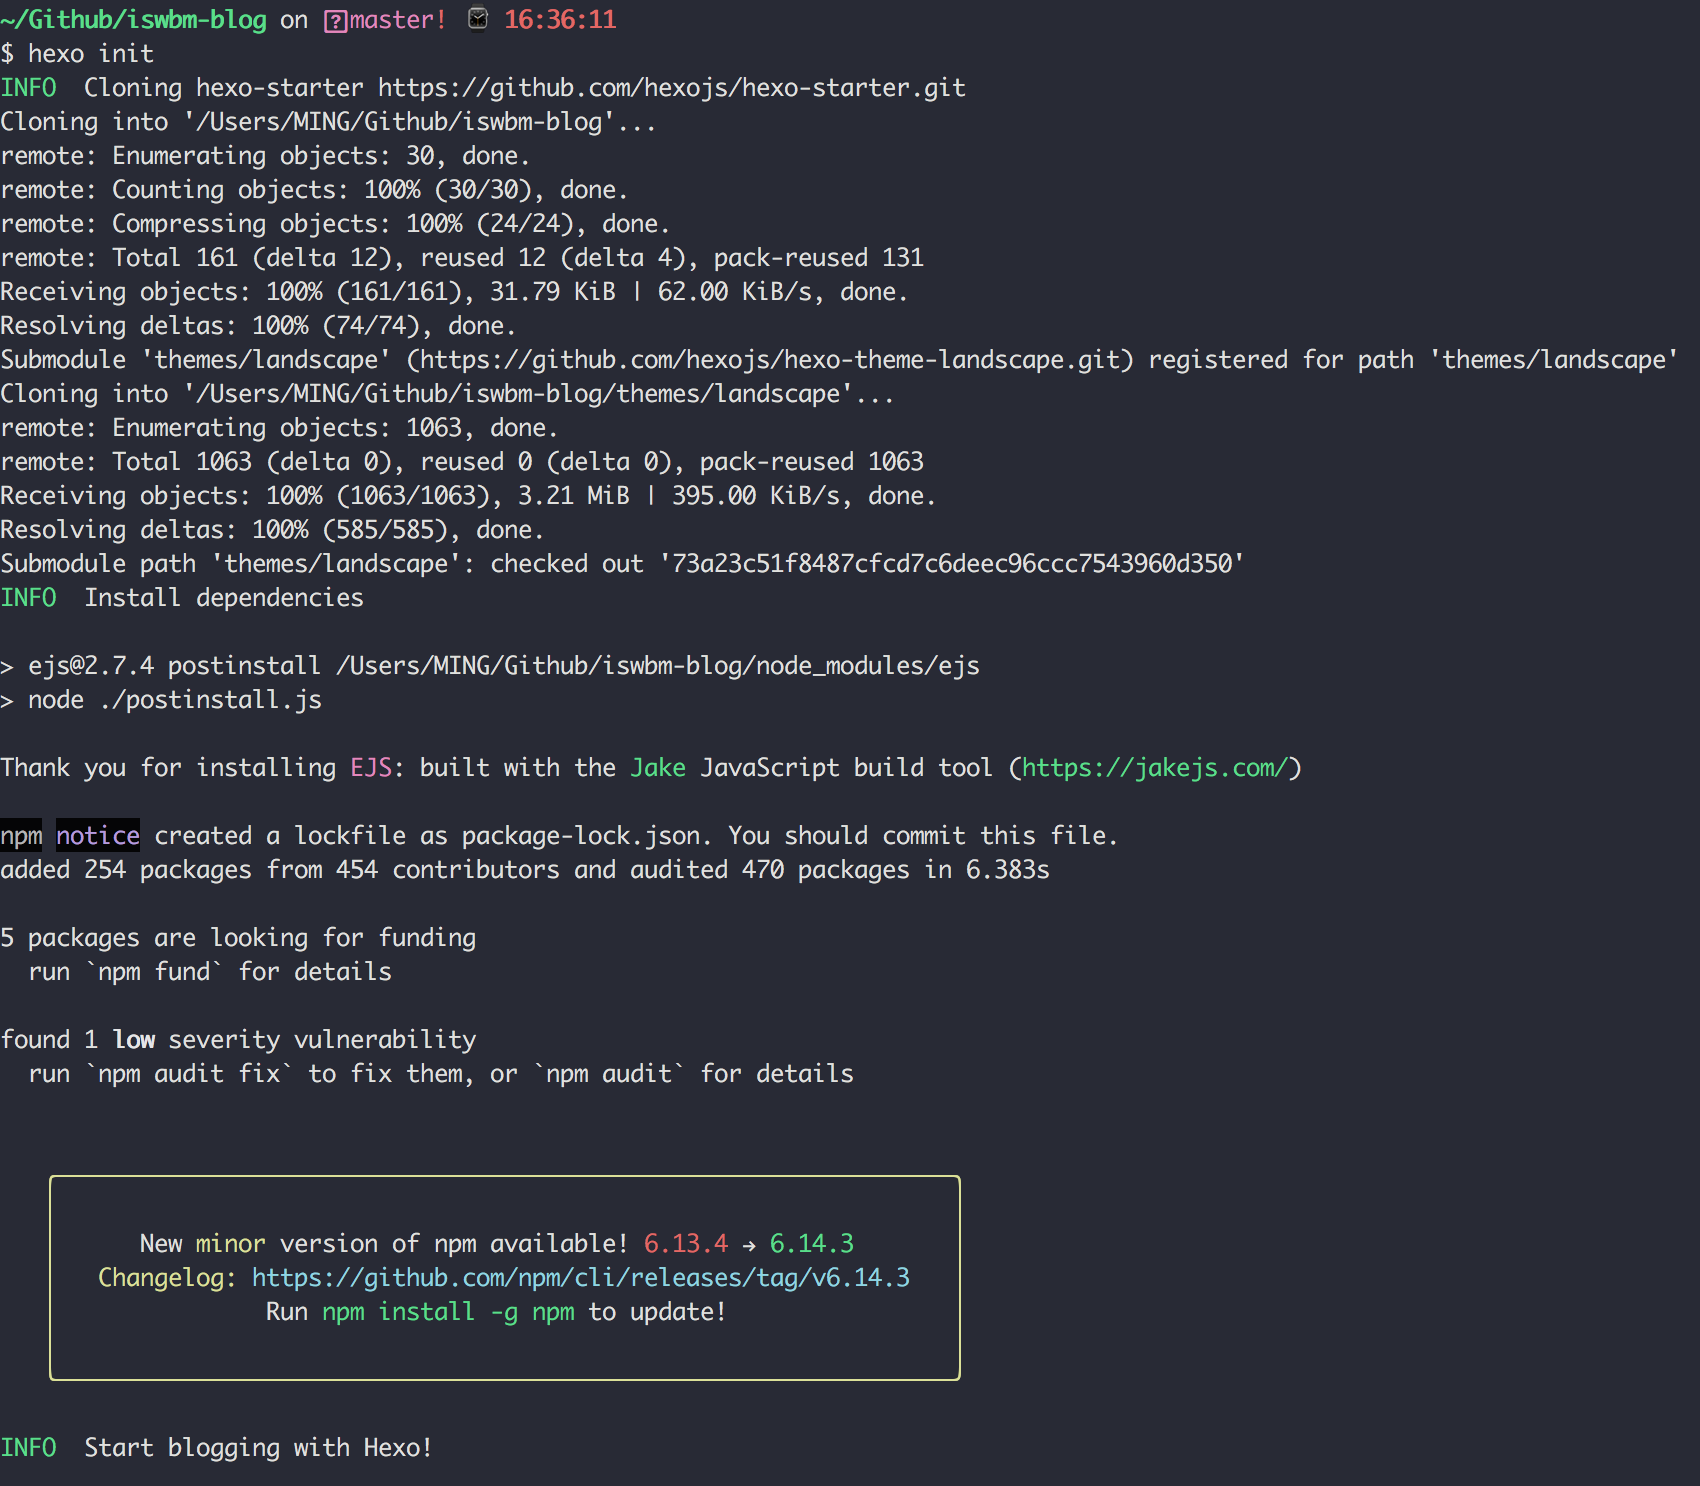
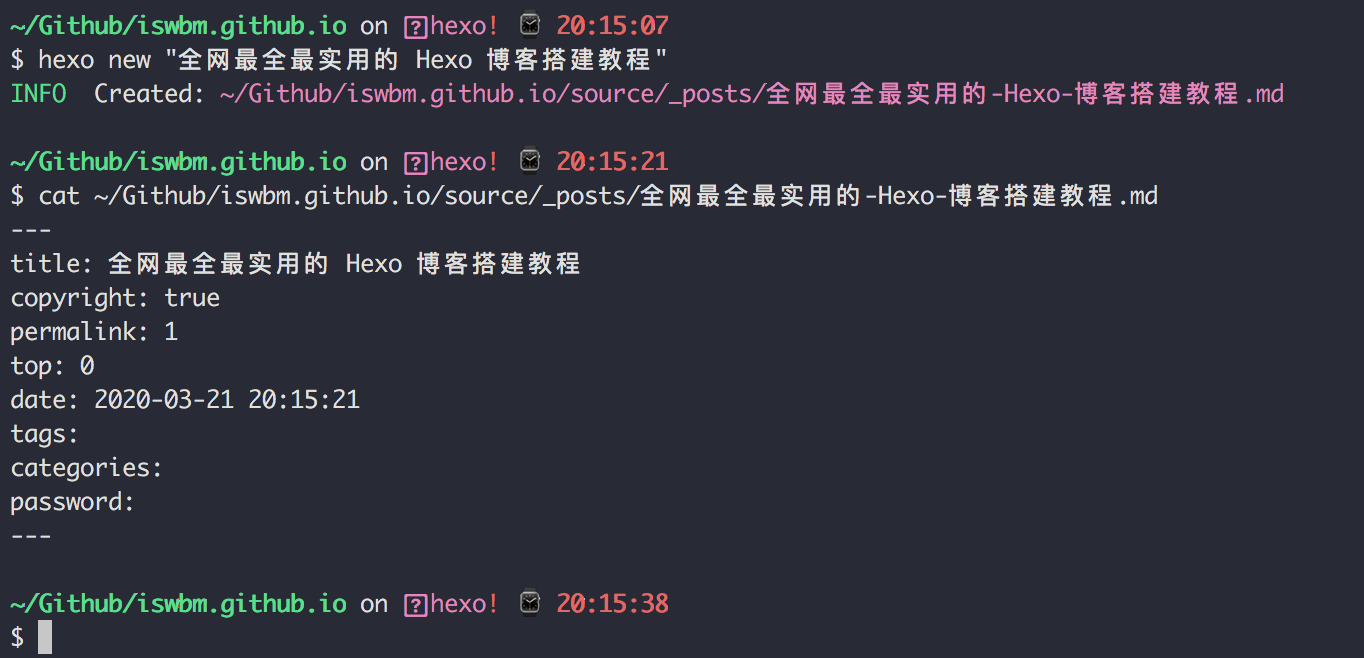
新创建一个目录,比如叫做
iswbm-blog使用终端进入该文件夹内,执行
hexo init(初始化项目)
运行你的博客项目(用于调试),查看生成的文章是否符合自己的预期。
$ hexo g  # 生成静态文件
$ hexo s  # 运行本地web服务器
运行完 hexo s
会有一个本地web地址(localhost:4000)出现在你的屏幕,打开它即可看到。
1.3 部署上线
要让我们在 localhost:4000
看到的那些内容能够在公网能够访问。我们需要将其部署上线。
按照下面的步骤来
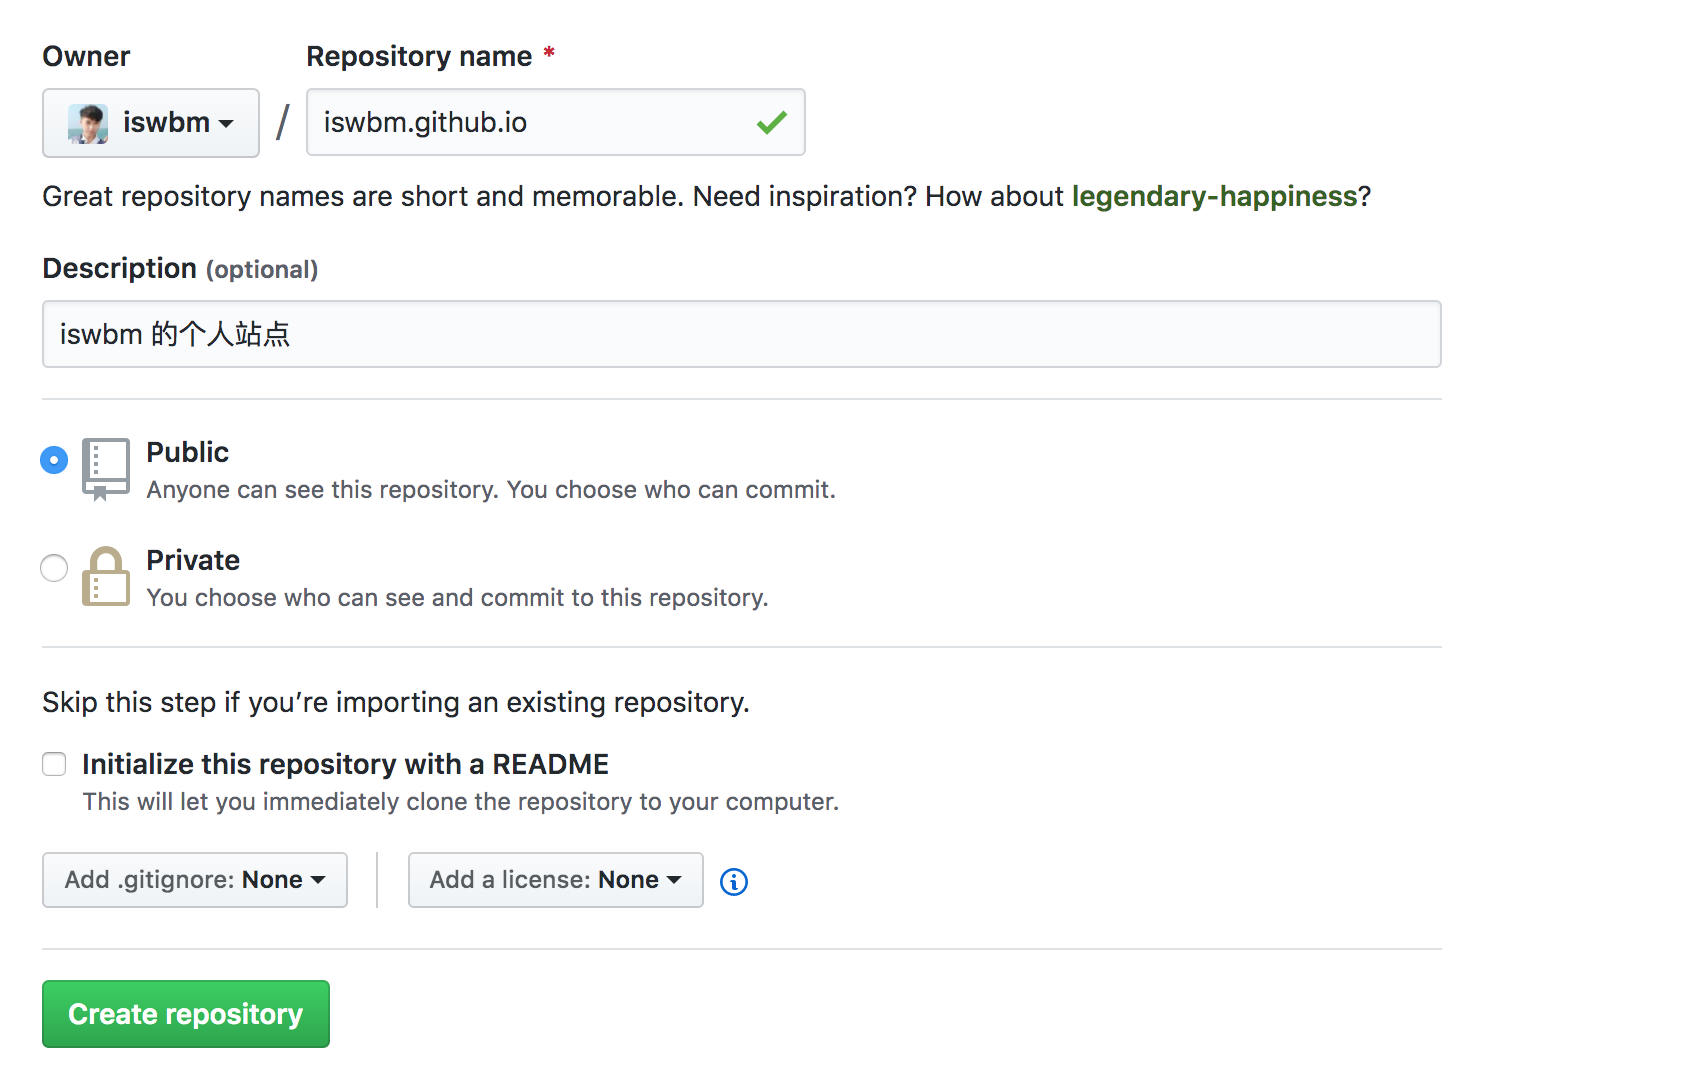
在Github上创建名字为XXX.github.io的项目,XXX为自己的github用户名。然后 clone 到你的本地电脑上。
打开该文件夹内的
_config.yml配置文件,将其中的type设置为git,其他配置如下
# Deployment
## Docs: https://hexo.io/docs/deployment.html
deploy:
  type: git
  repository: https://github.com/iswbm/iswbm.github.io.git
  branch: master
安装Git部署插件
$ npm install hexo-deployer-git --save
重新生成静态文件,部署上线。
$ hexo clean
$ hexo g
$ hexo d
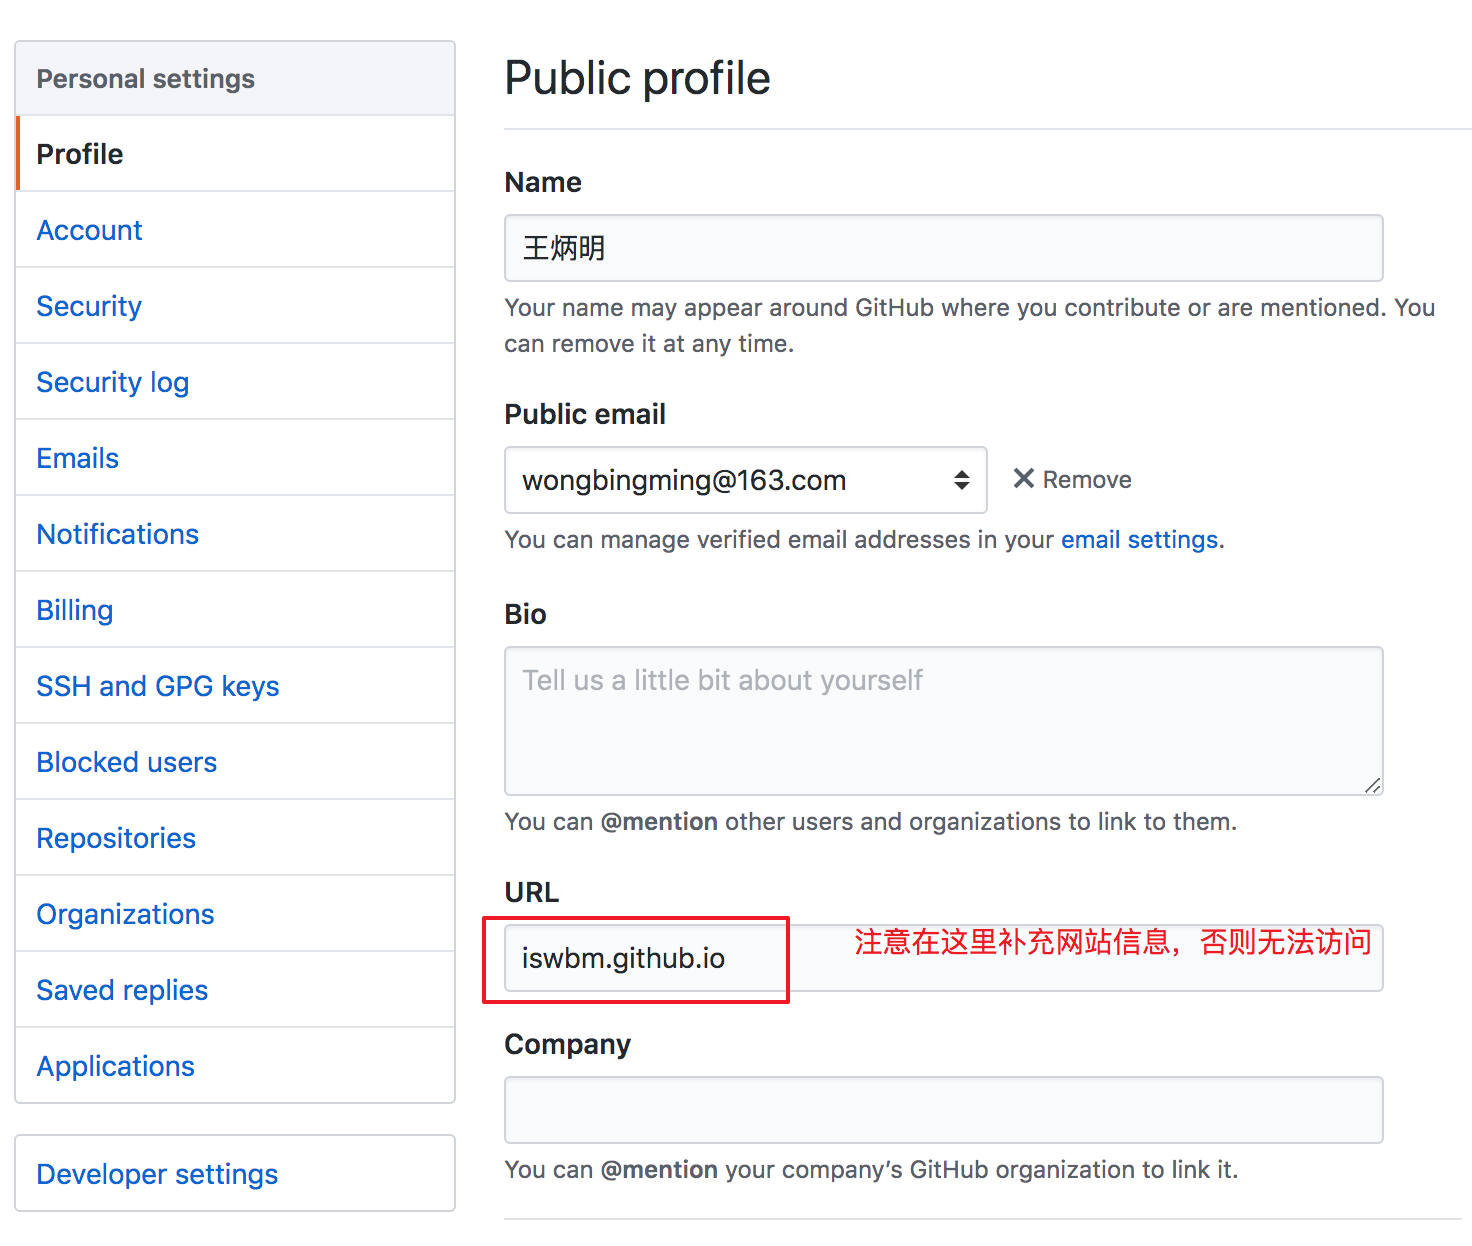
在第一次部署后,请到 github 后台,补充你的 网站信息,否则无法访问。
一切完成之后,你就可以通过上面的网址来访问我的博客了。
1.4 绑定域名
做为一个个人博客,使用 github的域名,明显不够个性化。
我们可以自己去阿里云购买一个域名(我的是 iswbm.com),然后将其 CNAME 到你的博客地址上。
去阿里云 域名云解析
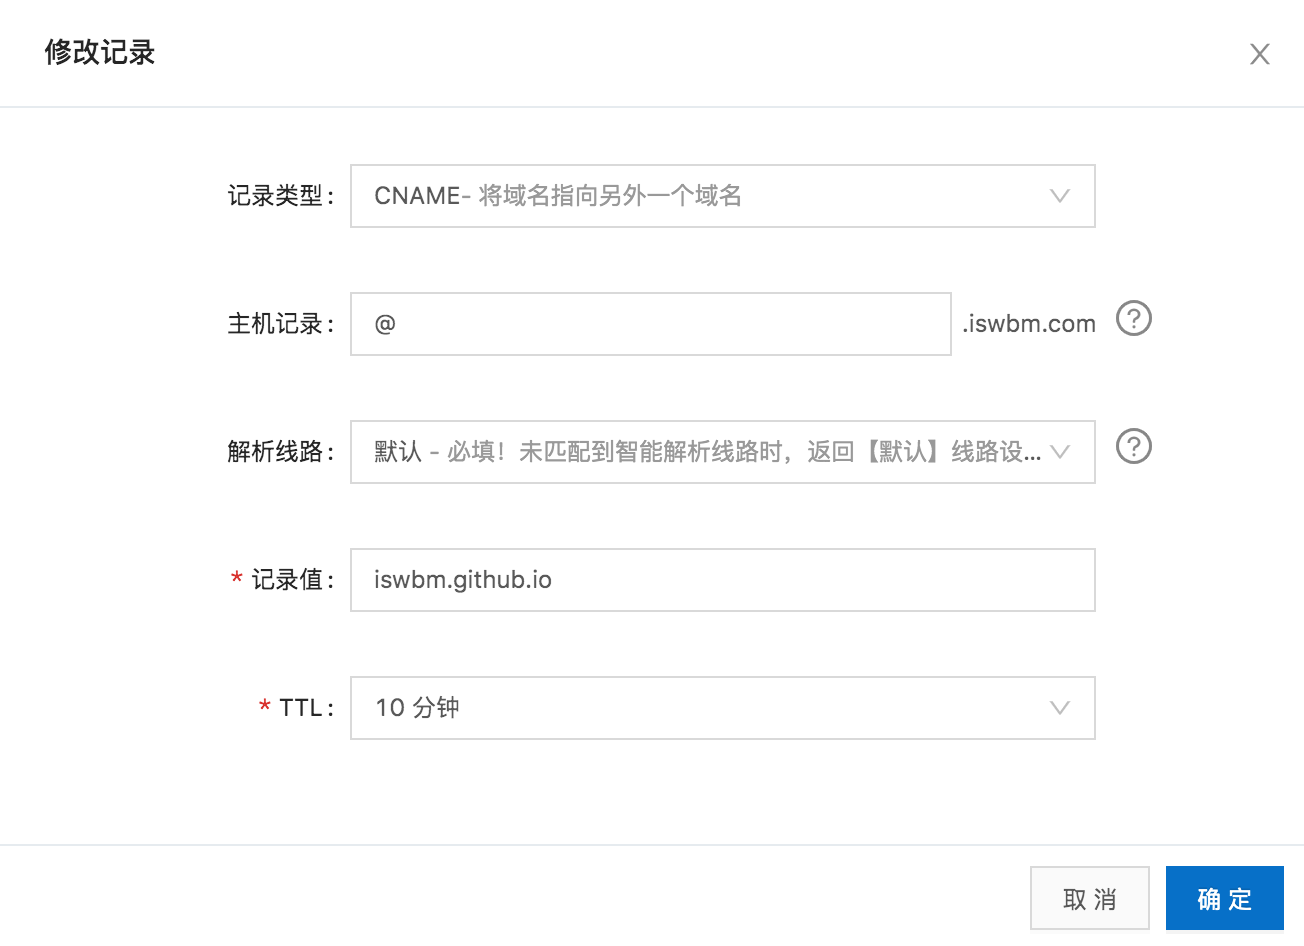
然后到对应的GitHub仓库,绑定我的个性域名
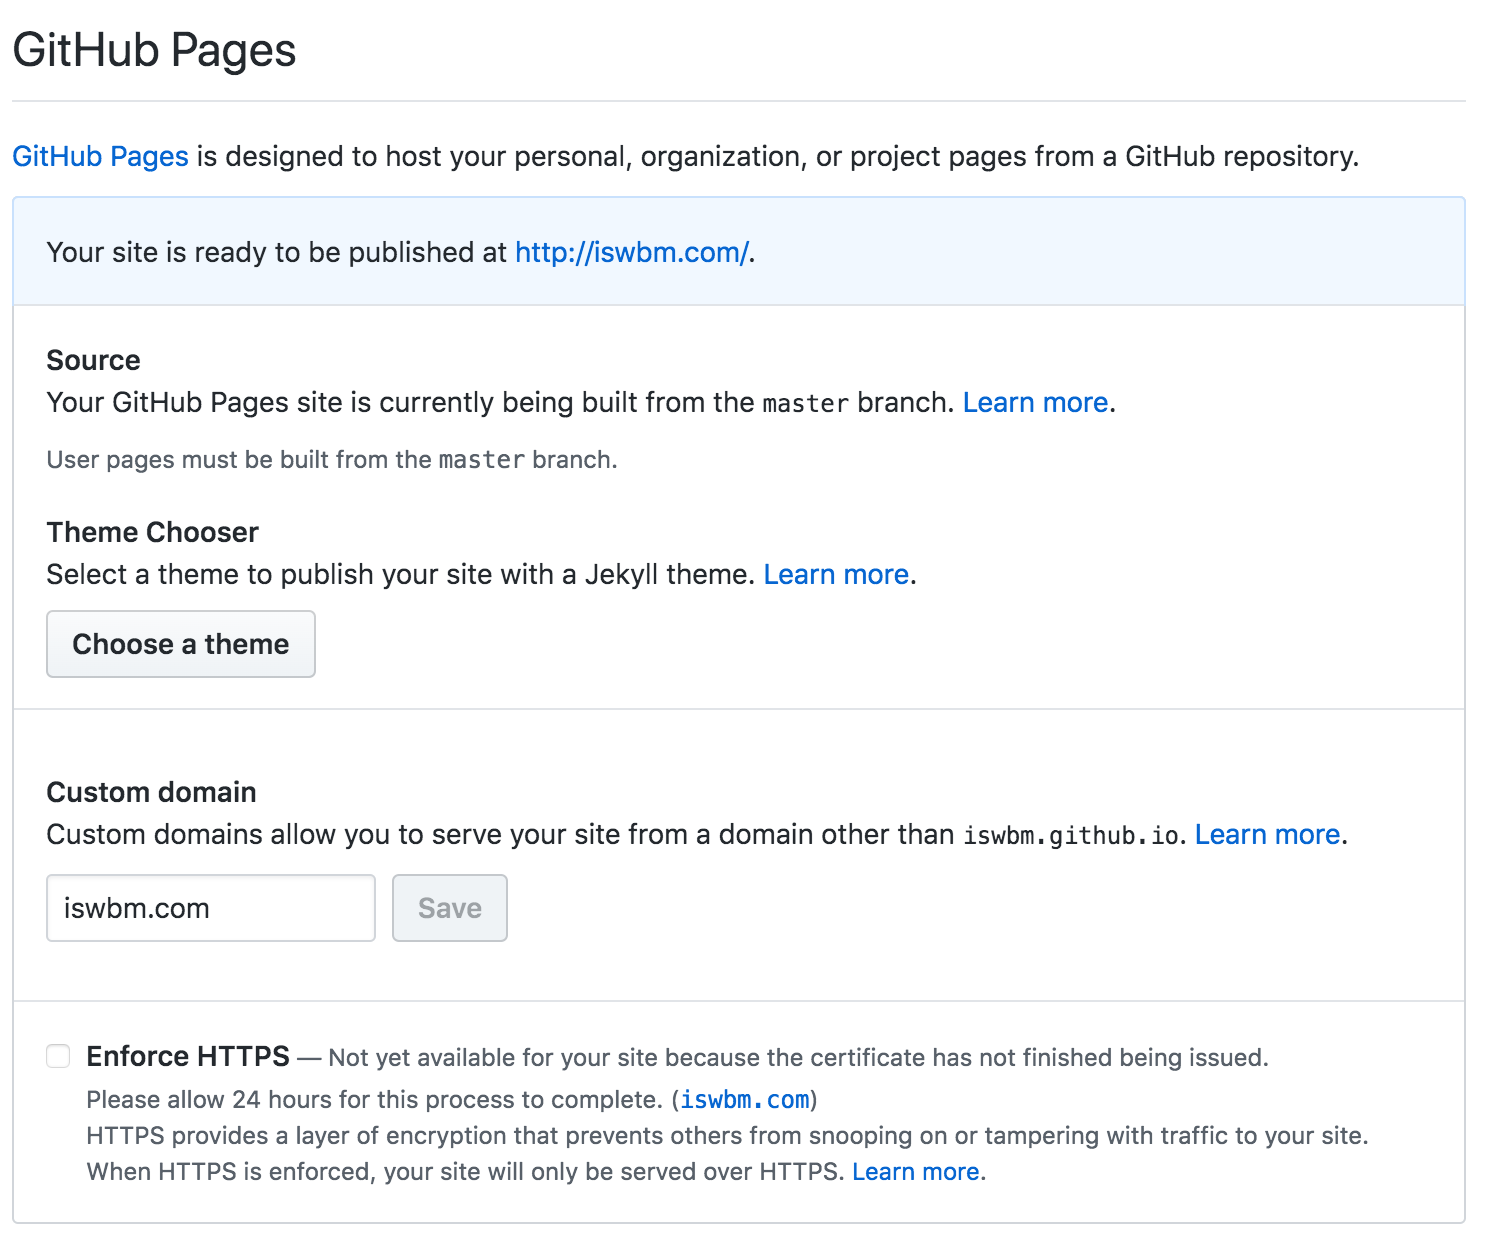
然后再在你本地的项目里的
source目录下新建CNAME文件,内容就是我的域名iswbm.com
然后重新部署,使配置生效。这样就可以使用域名访问。
$ hexo clean
$ hexo g
$ hexo d
三、博文书写技巧

四、美化博客
4.1 更换主题
在 hexo 部署目录下,使用如下命令下载主题
git clone https://github.com/iissnan/hexo-theme-next themes/next
打开站点配置文件(部署代码根目录下的
_config.yml)选择刚刚下载的next主题
# Extensions
## Plugins: https://hexo.io/plugins/
## Themes: https://hexo.io/themes/
theme: next
然后再编辑 themes/next/_config.yml 选择主题样式
scheme: Pisces
4.2 ico缩略图
1. 制作icon图标,最好是32x32,可以在这里制作:https://tool.lu/favicon/

2. 将制作的ico文件,放到next主题source/images目录下

3. 配置ico文件路径。配置文件在 themes/next/_config.yml
favicon:
  small: /images/favicon-16x16-next.ico
  medium: /images/favicon-32x32-next.ico
4.3 菜单栏和图标
menu:
  home: / || home
  about: /about/ || user
  tags: /tags/ || tags
  categories: /categories/ || th
  archives: /archives/ || archive
  schedule: /schedule/ || calendar
  # sitemap: /sitemap.xml || sitemap
  # commonweal: /404/ || heartbeat

# Enable/Disable menu icons.
menu_icons:
  enable: true
4.4 社交网络和图标
social:
  GitHub: https://github.com/iswbm || github
  E-Mail: mailto:wongbingming@163.com || envelope-o
  微博: http://weibo.com/942663728 || weibo
  WeChat: http://image.iswbm.com/17-9-9/58657236.jpg || weixin
  知乎: https://www.zhihu.com/people/wongbingming/activities || chain-broken
  CnBlog: http://www.cnblogs.com/wongbingming/ || file-text-o

social_icons:
  enable: true
  icons_only: false
  transition: false
4.5 背景动画
在next下的_config.yml找到canvas_nest设置为True
4.6 添加热度
next主题集成leanCloud,我只需稍微配置下(在主题配置文件)
其中的id和key要去LeanCloud注册登录然后创建应用后,新建Class,名字一定要是Counter,然后查看id和key填入
post_meta:
  item_text: true

leancloud_visitors:
  enable: true
  app_id: 你的id
  app_key: 你的key
打开themes/next/layout/_macro/post.swig
在”leancloud-visitors-count”>标签后面添加℃。
然后打开,themes/next/languages/zh-Hans.yml,将visitors内容改为热度即可。
为什么不直接用不蒜子,因为首页的时候,无法显示。 如果也开了不蒜子的计数功能的话,可以直接把下面代码删掉
{% if not is_index and theme.busuanzi_count.enable and theme.busuanzi_count.page_pv %}
            <span class="post-meta-divider">|</span>
            <span class="page-pv">{{ theme.busuanzi_count.page_pv_header }}
            <span class="busuanzi-value" id="busuanzi_value_page_pv" ></span>{{ theme.busuanzi_count.page_pv_footer }}
            </span>
{% endif %}
如果你在前端看到了这个错误
Code 504: The app is archived, please restore in console before use.
很好解决,前往 LeanCloud 重新激活应用即可。
如果在前端又出现了这个错误
Code 403: 访问被api域名白名单拒绝,请检查你的安全域名设置.
也很好解决,前往 LeanCloud 绑定你的域名即可。不过要注意的是这个域名,你得备案,否则会绑定失败
4.7 分享插件JiaThis
默认有好多分享平台,可以在jiathis.swig里删除不需要的
jiathis:
  uid: 2135144 #Get this uid from http://www.jiathis.com/
# add_this_id:
隐藏页脚的hexo强力驱动,在footer.swig里注释这段代码
<!--
{% if theme.copyright %}
<div class="powered-by">{#
#}{{ __('footer.powered', '<a class="theme-link" href="https://hexo.io">Hexo</a>') }}{#
#}</div>
<span class="post-meta-divider">|</span>
<div class="theme-info">{#
#}{{ __('footer.theme') }} — {#
#}<a class="theme-link" href="https://github.com/iissnan/hexo-theme-next">{#
#}NexT.{{ theme.scheme }}{#
#}</a> v{{ theme.version }}{#
#}</div>
{% endif %}
-->
4.8 Fork me on Github
点击这里挑选自己喜欢的样式,并复制代码
然后粘贴刚才复制的代码到themes/next/layout/_layout.swig文件中(放在<div class="headband"></div>的下面),并把href改为你的github地址
4.10 添加版权
修改themes/next/layout/_macro/post-copyright.swig如下
<ul class="post-copyright">
  <li class="my_post-copyright-author">
    <strong>{{ __('post.copyright.author') + __('symbol.colon') }}</strong>
    {{ config.author }}
  </li>
  <li class="my_post-copyright-link">
    <strong>本文链接:</strong>
    <a href="{{ post.permalink }}" title="{{ post.title }}">{{ post.permalink }}</a>
  </li>
  <li class="my_post-copyright-link">
    <strong>发布时间:</strong>{{ page.date.format("YYYY年MM月DD日 - HH:MM") }}
  </li>
  <li class="my_post-copyright-link">
    <strong>最后更新:</strong>{{ page.updated.format("YYYY年MM月DD日 - HH:MM") }}
  </li>

  <li class="my_post-copyright-license">
    <strong>{{ __('post.copyright.license_title') + __('symbol.colon') }} </strong>
    {{ __('post.copyright.license_content', theme.post_copyright.license_url, theme.post_copyright.license) }}
  </li>
</ul>
到主题配置文件,改enable为True
post_copyright:
  enable: true
  license: CC BY-NC-SA 3.0
  license_url: https://creativecommons.org/licenses/by-nc-sa/3.0/
4.11 文章结尾页眉
在路径themes/next/layout/_macro中新建 passage-end-tag.swig
文件,并添加以下内容:
<div>
    {% if not is_index %}
        <div style="text-align:center;color: #ccc;font-size:14px;">-------------Page's over<i class="fa fa-paw"></i>Thanks for reading-------------</div>
    {% endif %}
</div>
接着打开themes/next/layout/_macro/post.swig文件,添加如下下代码,注意位置
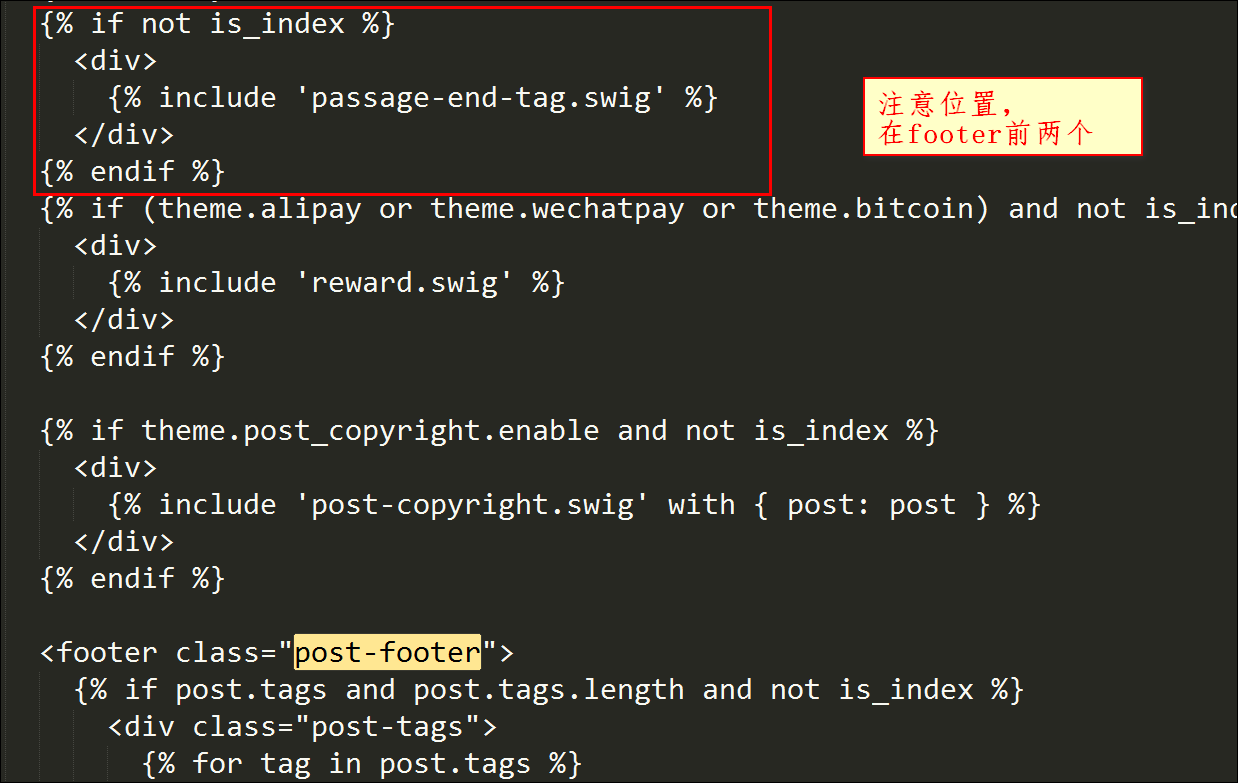 代码如下:
代码如下:
<div>
  {% if not is_index %}
    {% include 'passage-end-tag.swig' %}
  {% endif %}
</div>
然后再主题文件增加如下配置,以便可以方便开关这个功能
# 文章末尾添加“本文结束”标记
passage_end_tag:
  enabled: true
4.12 更改标签的图标
修改模板/themes/next/layout/_macro/post.swig,搜索
rel=”tag”>#,将 # 换成
<i class="fa fa-tag"></i>
4.13 添加访问量和访客数
\themes\next\layout_partials\footer.swig最前面添加如下代码
<script async src="https://dn-lbstatics.qbox.me/busuanzi/2.3/busuanzi.pure.mini.js"></script>
4.14 更改容器宽度
更改NexT容器宽度可以参考这个常见问题
Pisces Scheme比较特殊。
在themes/next/source/css/_schemes/Pisces/_layout.styl最后面增加如下样式
.header{
    width: 80%;
    +tablet() {
        width: 100%;
    }
    +mobile() {
        width: 100%;
    }
}
.container .main-inner {
    width: 80%;
    +tablet() {
        width: 100%;
    }
    +mobile() {
        width: 100%;
    }
}
.content-wrap {
    width: calc(100% - 260px);
    +tablet() {
        width: 100%;
    }
    +mobile() {
        width: 100%;
    }
}
4.15 自定义CSS
默认的博客文章,是按照你选定的主题来显示。其中可能有些并不那么尽如你意。
但是没有关系,你可以自己定义自己满意的css样式,以下是我自己定义的。在这里做个记录。
# 设置图片不居中
themes/next/source/css/_common/components/post/post-expand.styl

.post-gallery-row .fancybox img { margin: 0 auto !important;}


# 标题格式
themes/next/source/css/_common/scaffolding/base.styl

h1 {
    font-size: 27px;
    position: relative;
    padding: 15px;
    margin-bottom: 20px;
    border: 1px solid #eee;
    border-radius: 3px;
    border-left-color: red;
    border-left-width: 5px;
    background-color: #406CA4;
    color: #ffffff;
    font-family: cursive;
    border-radius: 15px 15px 15px 15px !important;
}
4.16 添加头像
将你的头像放置到 themes/next/source/images/avatar.png
在 themes/next/_config.yml 设置路径
avatar: /images/avatar.png
4.17 设置中文
在根目录的 _config.yml 里 把 language 改成
zh-Hans,这个值是要和 themes/next/languages
目录下的文件名保持一致。
4.18 不渲染 README
在根目录创建 README.md 文件,内容由你决定。
然后在 _config.yml 修改配置
skip_render: README.md
4.18 页面出现 %20 问题
Next 主题的配置文件有一个原生 bug,就是菜单项后面会多一个空格,这会导致你在页面访问 about,tags等页面时,会报 404,原因是地址后面多了个空格。

五、其他实用功能
5.1 给文章加密
打开themes->next->layout->_partials->head.swig文件,搜索pace,在这个代码块后面插入这样一段代码:
<script>
    (function(){
        if('{{ page.password }}'){
            if (prompt('请输入文章密码') !== '{{ page.password }}'){
                alert('密码错误!');
                history.back();
            }
        }
    })();
</script>
然后文章中设置
password: 你的密码
5.2 博文压缩
在站点的根目录下执行以下命令:
$ npm install gulp -g
$ npm install gulp-minify-css gulp-uglify gulp-htmlmin gulp-htmlclean gulp --save
在根目录下新建gulpfile.js
var gulp = require('gulp');
var minifycss = require('gulp-minify-css');
var uglify = require('gulp-uglify');
var htmlmin = require('gulp-htmlmin');
var htmlclean = require('gulp-htmlclean');
// 压缩 public 目录 css
gulp.task('minify-css', function() {
    return gulp.src('./public/**/*.css')
        .pipe(minifycss())
        .pipe(gulp.dest('./public'));
});
// 压缩 public 目录 html
gulp.task('minify-html', function() {
  return gulp.src('./public/**/*.html')
    .pipe(htmlclean())
    .pipe(htmlmin({
         removeComments: true,
         minifyJS: true,
         minifyCSS: true,
         minifyURLs: true,
    }))
    .pipe(gulp.dest('./public'))
});
// 压缩 public/js 目录 js
gulp.task('minify-js', function() {
    return gulp.src('./public/**/*.js')
        .pipe(uglify())
        .pipe(gulp.dest('./public'));
});
// 执行 gulp 命令时执行的任务
gulp.task('default', [
    'minify-html','minify-css','minify-js'
]);
生成博文是执行hexo g && gulp就会根据gulpfile.js中的配置,对public目录中的静态资源文件进行压缩。
5.3 设定置顶/顺序
F:\MyBlog\node_modules\hexo-generator-index\lib\generator.js改成下面
'use strict';
var pagination = require('hexo-pagination');
module.exports = function(locals){
  var config = this.config;
  var posts = locals.posts;
    posts.data = posts.data.sort(function(a, b) {
        if(a.top && b.top) { // 两篇文章top都有定义
            if(a.top == b.top) return b.date - a.date; // 若top值一样则按照文章日期降序排
            else return b.top - a.top; // 否则按照top值降序排
        }
        else if(a.top && !b.top) { // 以下是只有一篇文章top有定义,那么将有top的排在前面(这里用异或操作居然不行233)
            return -1;
        }
        else if(!a.top && b.top) {
            return 1;
        }
        else return b.date - a.date; // 都没定义按照文章日期降序排
    });
  var paginationDir = config.pagination_dir || 'page';
  return pagination('', posts, {
    perPage: config.index_generator.per_page,
    layout: ['index', 'archive'],
    format: paginationDir + '/%d/',
    data: {
      __index: true
    }
  });
};
在文章中添加 top 值,数值越大文章越靠前(默认是0,按时间排序),如
---
title: 解决Charles乱码问题
date: 2017-05-22 22:45:48
tags: 技巧
categories: 技巧
copyright: true
top: 100
---
5.7 文章内链接文本样式
在F:\MyBlog\themes\next\source\css\_common\components\post\post.styl
// 文章内链接文本样式
.post-body p a{
  color: #0593d3;
  border-bottom: none;
  border-bottom: 1px solid #0593d3;
  &:hover {
    color: #fc6423;
    border-bottom: none;
    border-bottom: 1px solid #fc6423;
  }
}
其中选择.post-body 是为了不影响标题,选择 p 是为了不影响首页“阅读全文”的显示样式,颜色可以自己定义。
5.8 归档设置分页数量
在根目录的 _config.yml
index_generator:
  per_page: 5

archive_generator:
  per_page: 20
  yearly: true
  monthly: true

tag_generator:
  per_page: 10
5.9 设置永久链接
在根目录的 _config.yml
permalink: :year/:i_month/:i_day/:title.html
博文里设置一下,举个例子
permalink: Database-MySQL-Basic_usage
六、多台电脑协同更新博客
上班后,工作都会给配置了一台电脑,而自己家里也有电脑,有时候我想使用家里电脑更新博客,而有时候我也想使用公司电脑更新博客。
这就很蛋疼了,因为Markdown的原文只有一份,如何将两台电脑的原文保持一致呢。当然,容易想到的是代管在Github上。
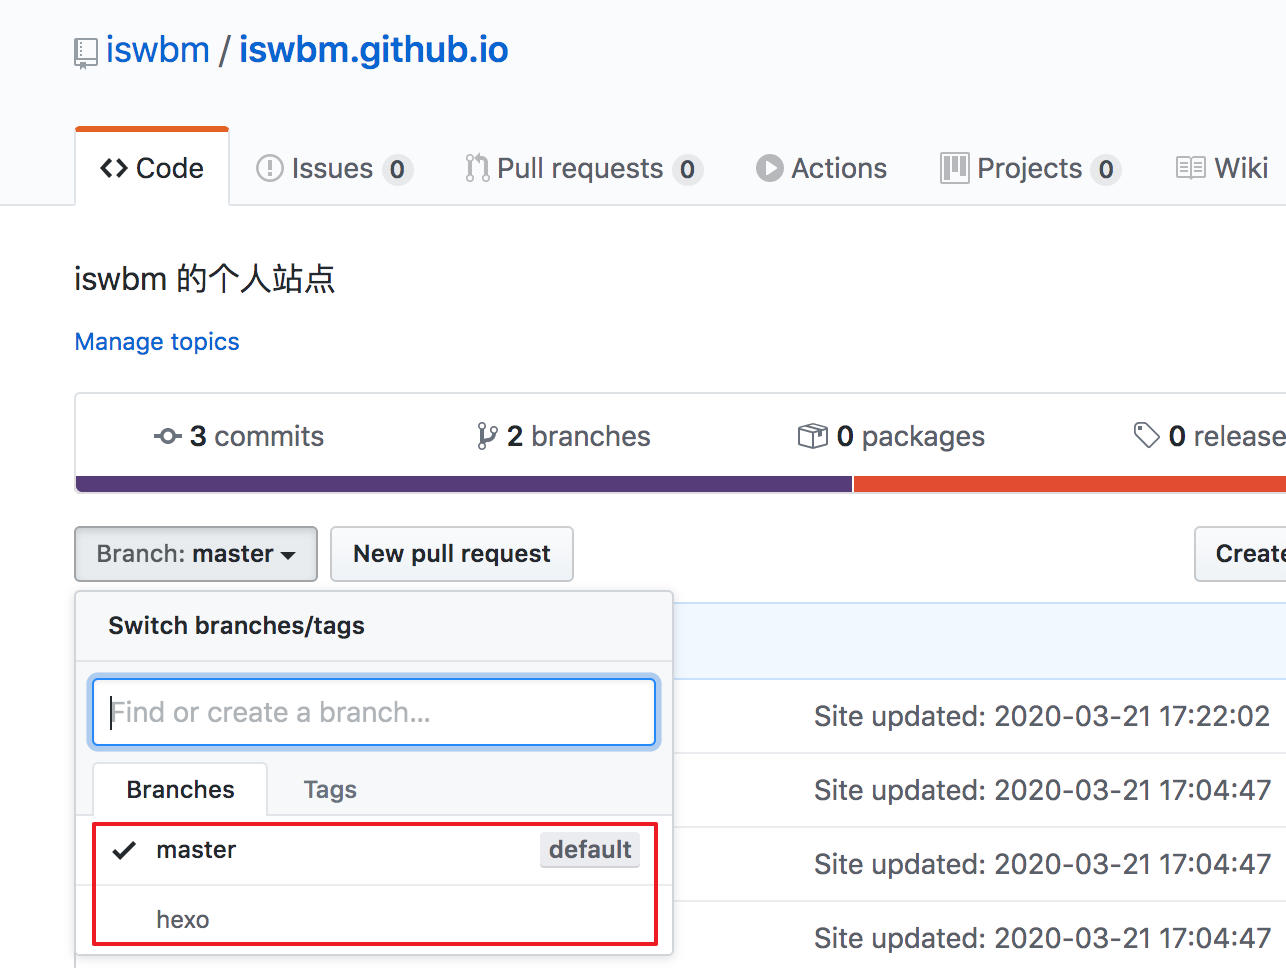
6.1 Github上操作
将博客项目分成两个分支 * master为博客界面前端文件 * hexo
为博文markdown原文
在web界面新建分支,命名为hexo
在web界面设置 hexo 为默认分支,因为我们只会在这个分支上进行操作。
6.2 本地PC操作
clone项目到本地:
git clone git@github.com:iswbm/iswbm.github.io.git
使用 git branch
确认此时的分支是否为hexo,如果不是则上面设置默认分支有误,要重新设置。
6.3 处理hexo分支
第一步我们创建hexo分支时,hexo的内容和master的内容是完全一致的,存放的是博客前端文件,这并不是我们想要的,所以我们要先将其清空,再放入我们的文件。
清空hexo分支
git checkout --orphan hexo
git rm -rf .
git commit -m "clear hexo branch"
git push origin hexo
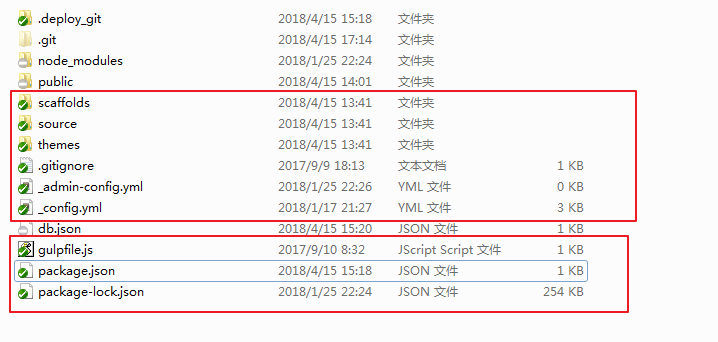
将博客原始文件添加进来,但是有一些是没必要放的,具体要放哪些文件,看图片。
git add -A
git commit -m "add blog markdown raw files"
添加node_modules/文件夹 本来这个文件夹,不需要拷过来的,但是怕安装
hexo-deployer-git 失败,所以之前要拷贝的。
可以从下面这个链接里获取:
下载链接;https://pan.baidu.com/s/1-DHgTuxb0mCj_7wdaKqAwQ 获取密码:pckc
然后检查是否正常渲染
hexo g
hexo s
如果一切正常,那么再确认下 _config.yml
文件的deploy参数的分支是master,我们可不能将其发布到 hexo 分支。
确认过后,我们就可以发布博客了。
hexo d
如果发布出现问题,可能是 hexo-deployer-git
这个插件安装有误,就要想办法装上了。这里就不讲了。
七、更换电脑后如何迁移博客
在真实场景里,我们会有可能会换电脑或者将系统进行重装操作,而这个时候如何将之前的电脑上项目(主要是 Markdown原文)迁移过来呢?
在七、多台电脑协同更新博客
这一节里,我们已经讲过,如何将md原文进行管理。
那就好办了呀。只要将之前的项目 clone 下来就可以了呀。
首先肯定是要在新电脑上安装Git,Node.Js,Hexo
7.1 工具安装
安装Git:百度自行下载
安装npm:到 官网 下载exe文件安装
安装hexo:执行以下命令安装(注意需要新开一个git
bash窗口,不然会提示找不到npm命令)
npm install -g hexo
7.2 clone最新分支
git clone git@github.com:iswbm/iswbm.github.io.git
添加node_modules/文件夹 本来这个文件夹,不需要拷过来的,但是怕安装
hexo-deployer-git 失败,所以这里我直接备份一份,可以拷贝覆盖上即可。
下载链接;https://pan.baidu.com/s/1-DHgTuxb0mCj_7wdaKqAwQ 获取密码:pckc
完成之后,应该就可以正常更新博客了。
在写完文章后,一定要注意操作顺序。
先将hexo分支push要远端
再执行部署到master分支。
不然哪天这个电脑又出现故障,那就麻烦了。
