8.2 OpenStack 部署SR-IOV

摘要: SR-IOV 技术是一种基于硬件的虚拟化解决方案,可提高性能和可伸缩性。SR-IOV 标准允许在虚拟机之间高效共享 PCIe(Peripheral Component Interconnect Express,快速外设组件互连)设备,并且它是在硬件中实现的,可以获得能够与本机性能媲美的 I/O 性能。
SR-IOV 规范定义了新的标准,根据该标准,创建的新设备可允许将虚拟机直接连接到 I/O 设备。
8.2.1 基础环境准备
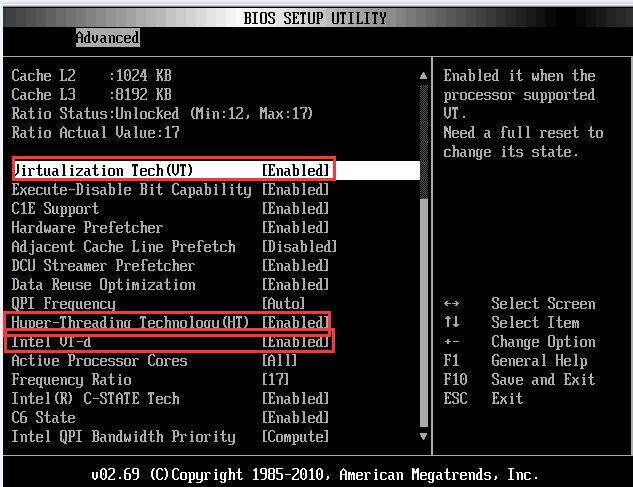
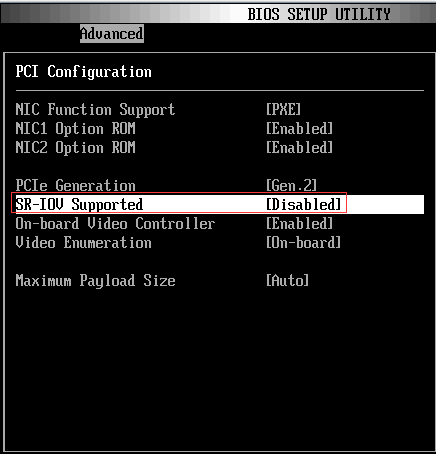
8.2.1.1 bios开启vt-d, sriov
8.2.1.2 开启iommu
vim /etc/sysconfig/grub(或者/etc/default/grub):intel_iommu=on
 改完后,重新生成配置
grub2-mkconfig -o /etc/grub2.cfg
8.2.1.3 开启igb模块
modprobe igb max_vfs=32   # 开启模块
echo "options igb max_vfs=32" >>/etc/modprobe.d/igb.conf   # 持久化
8.2.1.4 配置VF数量
echo "echo '32' > /sys/class/net/eth0/device/sriov_numvfs" >> /etc/rc.local

# 验证VF是否创建完成
lspci |grep Ethernet
8.2.1.5 验证基础环境
尝试将VF分配给虚拟机
首先先运行一个虚拟机 然后,在创建的众多VF中取得一个来测试,比如我取
pci_0000_84_10_4
1.  先从host detach:virsh nodedev-detach pci_0000_84_10_4
2.  新建sr-ov.xml
---------------------sr-iov.xml-------------
<interface type='hostdev'>
 <source>
  <address type='pci' domain='0x0000' bus='0x84' slot='0x10' function='0x04'/>
 </source>
</interface>
   -------------------------------------------------
3.  attach给虚拟机:virsh attach-device [vm_name] sr-iov.xml --persistent
4.  进入虚拟机,检测网卡速率:ethtool [nic_name]|grep Speed
如果以上可以顺利运行,就说明基础环境已经配置好。
8.2.2 计算节点
8.2.2.1 nova-compute
指定白名单,告诉OpenStack,允许的直通网卡是eth0所有的VF都来自于这张网卡,并且说明这个网络归属于physnet2
vim /etc/nova/nova.conf
[default]
pci_passthrough_whitelist = { "devname": "eth0", "physical_network": "phynet2"}
或者,如果不想使用一张网卡上的所有VF那么就可以,指定一个VF列表 *通配符,表示所有 格式
pci_passthrough_whitelist={"address":"<domain>:<bus>:<slot>.<function>", physical_network": "physnet2" }
例子如下:
[default]
pci_passthrough_whitelist = { "address": "*:0a:00.*", "physical_network": "physnet2" }
亦或者,也可以根据vendor_id 和product_id来筛选。
pci_passthrough_whitelist = {"vendor_id": "<id>", "product_id":"<id>", "physical_network": "physnet2" }
重启服务,使配置生效
service openstack-nova-compute restart
查看数据库,compute_nodes,确认VF是否有被管理起来 
8.2.3 控制节点
8.2.3.1 neutron-server
vim /etc/neutron/plugins/ml2/ml2_conf.ini 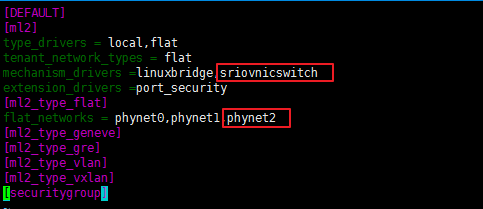
添加sriov配置文件(如果没有此文件,就添加) vim /etc/neutron/plugins/ml2/ml2_conf_sriov.ini
[DEFAULT]
[ml2_sriov]
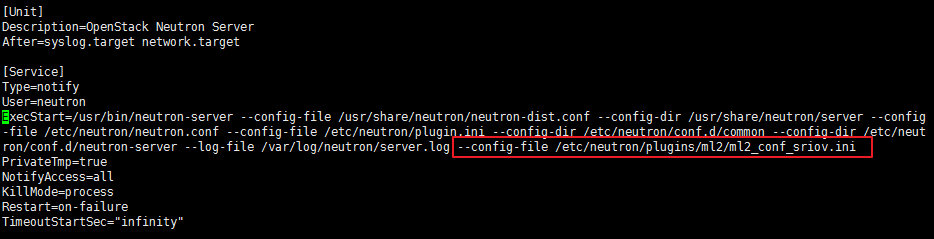
添加neutron-server 启动参数 (如果没有此参数,就添加) vim /usr/lib/systemd/system/neutron-server.service
--config-file /etc/neutron/plugins/ml2/ml2_conf_sriov.ini
重启服务,使配置生效
systemctl restart neutron-server
8.2.3.2 nova-scheduler
添加filter
[DEFAULT]
scheduler_default_filters= RetryFilter,ComputeFilter,AggregateInstanceExtraSpecsFilter,CoreFilter,RamFilter, PciPassthroughFilter
scheduler_available_filters = nova.scheduler.filters.all_filters
重启服务,使配置生效
systemctl restart openstack-nova-scheduler
8.2.3.3 sriov-agent
安装sriov-agent
rpm ivh openstack-neutron-sriov-nic-agent-0.0.1.dev5-1.el7.centos.noarch
添加配置文件
vim /etc/neutron/plugins/ml2/sriov_agent.ini
[securitygroup]
firewall_driver = neutron.agent.firewall.NoopFirewallDriver

[sriov_nic]
physical_device_mappings = phynet2:eth0
exclude_devices =
其他说明
1.  physical_device_mappings 项,并不一定是 1-1的值,如果一个physical network 和两张nic连接,就可以这样写  phynet2:eth0,phynet2:eth1
2.  exclude_devices 项:一般为空,表示要排除的VF设备

举个例子如下:
exclude_devices = eth0:0000:07:00.2;0000:07:00.3,eth1:0000:05:00.1;0000:05:00.2
添加启动参数
vim /usr/lib/systemd/system/neutron-sriov-nic-agent.service
neutron-sriov-nic-agent \
  --config-file /etc/neutron/neutron.conf \
  --config-file /etc/neutron/plugins/ml2/sriov_agent.ini
重启服务,使配置生效
systemctl enable neutron-sriov-nic-agent.service
systemctl restart neutron-sriov-nic-agent.service
8.2.3.4 验证SRIOV网络
验证步骤
# 先创建一个sriov的网络
neutron net-create --provider:physical_network phynet2 --provider:network_type flat private-sriov
neutron subnet-create private-sriov 192.168.13.0/24 --gateway 192.168.13.1

# 取得 net 的id,该net是phynet2
net_id=`neutron net-show private-sriov |grep '\ id\ '|awk '{ print $4 }'`

# 创建port,并取得port_id
port_id=`neutron port-create $net_id --name sriov_port --binding:vnic_type direct | grep "\ id\ " | awk '{ print $4 }'`

# 绑定port,创建vm
nova boot --flavor [flavor_id] --image [image_id] --nic port-id=$port_id [sriov_vm_name]

# 查看是否创建成功,检查网络进入虚拟机后查看IP是否配上,检查所分配VF
验证结果
1.  同一台宿主机上,不同网络(同网段的网桥和VF)的虚拟机可共存
2.  同一台宿主机上,不同网络(同网段的网桥和VF)之间可以通信,宿主机可ssh登陆
3.  不同宿主机上的虚拟机之间可以通信
4.  给虚拟机分配公网IP,可以访问外网,DNS正常
8.2.4 OpenStack 改造
8.2.4.1 支持挂卸网卡
Sriov虚拟机在openstack原生是不支持挂卸网卡操作的,即nova interface-attach不适用于sriov port。
为了实现挂载的操作,需要加几步手工操作,具体步骤如下:
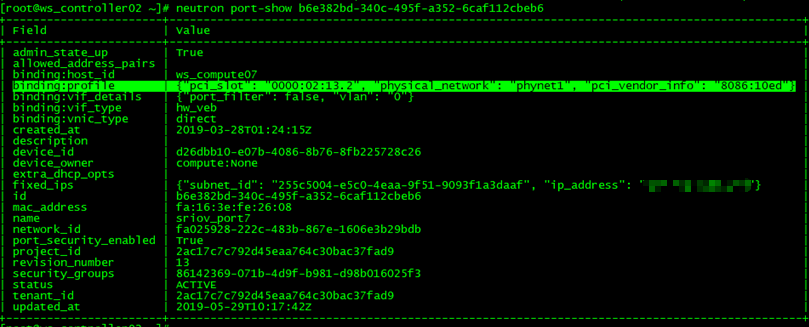
1、使用neutron port-show ,查看并记录原 port 的 binding:profile
信息,如果有多个port,把每个port的信息都记录下来。
2、nova interface-detach卸载原来的port。
3、neutron port-create –vnic-type direct 。。。。。 创建新的sriov port
4、更新新port的binding:profile,neutron port-update命令不支持,只能使用curl,需要修改port-id及binding:profile
source ~/admin-openrc; TOKEN=`openstack token issue |grep " id " |awk -F \| '{print $3}'`
curl -g -i -X PUT http://{vip}:port/v2.0/ports/3f0668f4-4b5a-4e11-93d4-10b7958668ae.json -H "User-Agent: python-neutronclient" -H "Content-Type: application/json" -H "Accept: application/json" -H "X-Auth-Token: $TOKEN" -d '{"port": {"binding:profile": {"pci_slot": "0000:02:13.6","physical_network": "phynet1", "pci_vendor_info": "8086:10ed"}}}'
5、挂载网卡
nova interface-attach 5a1c1828-4190-43fa-8e05-ae51b0196656 --port-id 3f0668f4-4b5a-4e11-93d4-10b7958668ae
如果port已经卸载,找不到pci_slot信息,可以在数据库中查找:登陆controller,登陆mysql数据库,2个port分别用2个address即可
select * from pci_devices where instance_uuid='5a1c1828-4190-43fa-8e05-ae51b0196656';

